Syntax Highlighter

martes, 21 de septiembre de 2021

Hi! I'm Goio, your travel partner in Tenerife

Let me introduce you to Goio, the virtual assistant of Tenerife Tourism. The island of Tenerife is located within the archipelago of the Canary Islands (Spain), where I was born and still live, enjoying one of the best climates in the world and therefore often described as the "island of eternal spring", with an average temperature ranging between 17º-24ºC throughout the year.

Because of these conditions and other aspects such as good maritime and air connections, the economic engine of the islands is logically tourism, since we receive more than 22 million tourists a year, who can enjoy from the best beaches in Europe to see the stars in one of the best skies in the world for astronomical activities, without leaving behind the great variety of local cuisine.

As one of the main tourist destinations within the second country with the most visitors per year in the world, creating a virtual assistant to help travelers learn about the possibilities of the island is a great responsibility. At Intelequia we knew that developing an artificial intelligence to meet these needs was going to be a big challenge, and what we didn't expect was that after its launch in 2019 it was going to become an ally when it came to informing tourists about the continuous updates and protocols during the health emergency, not only for visitors but also for residents. Nearly 20% of the queries made during the last 12 months have been to answer questions about COVID.

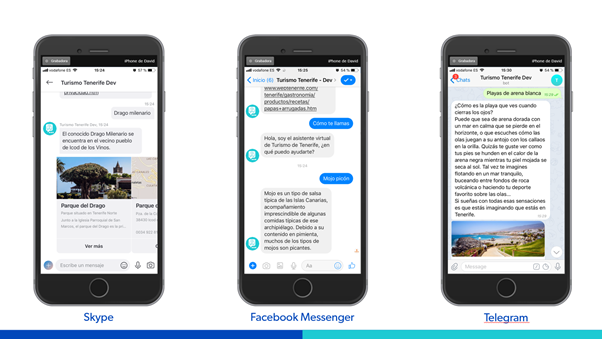
Available on various channels such as Webchat (including voice), Facebook or Telegram, it is now also available as an Alexa skill, both in Spanish and English, where it will soon also be available in French and German. After having dispatched more than 2 million messages in the last 24 months, we are happy to share that last May 20th it received the award at FITUR, the International Tourism Trade Fair, as winner in "The Chatbot Tourism Awards 2021" organized by SEGITTUR and FITUR.

How does Goio work?

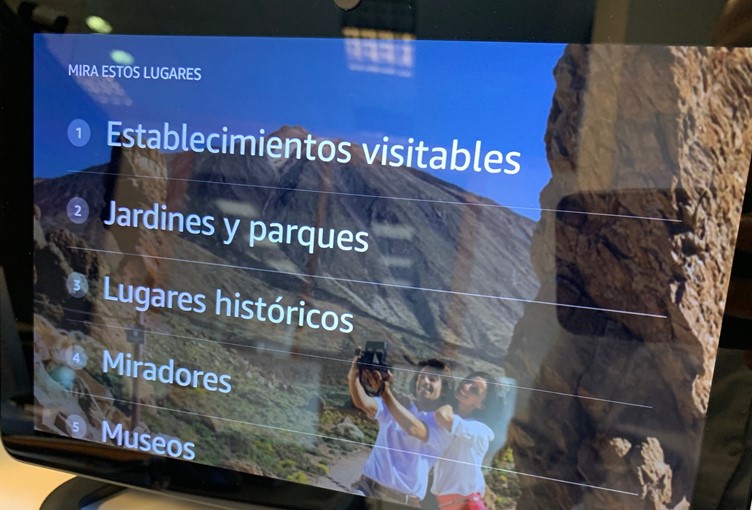
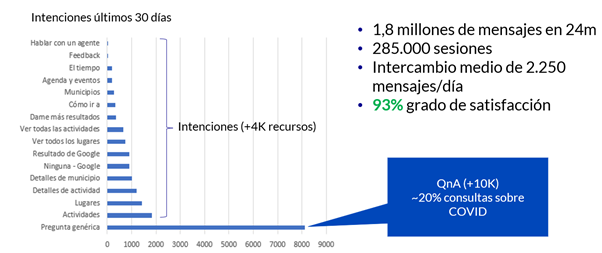
The virtual assistant is designed to satisfy queries with voice or text, based on a natural language model that is continuously being trained. When a question is asked to the virtual assistant, it tries to guess the intention of what the user is requesting from a series of "pre-trained" intentions, such as what to do on the island, which municipalities to visit, the most hidden beach or other activities to enjoy, based on more than 4,000 content resources that are integrated with the same website of Tenerife Tourism.

In addition to these resources, it is able to offer the weather forecast, the route to go from one point to another including public transport, know the cultural agenda, or get recommendations on where to eat thanks to the integration with TripAdvisor.

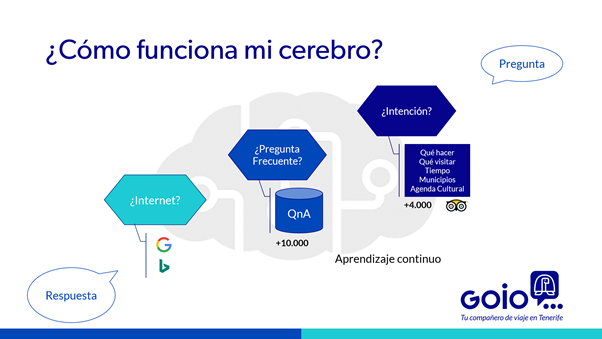
In the event that the question is not related to any of these intentions, it goes to a second level where an answer is sought on a knowledge database with more than 10,000 general questions where, among others, there are those related to the health emergency.

If an answer to a question is not found, a Google and Bing search is performed to present some answer to the user, so it is very rare that Goio does not know the answer to your needs as a traveler.

And in addition to doing so through standard messaging channels, it is now also available on Alexa, so you can now ask "Alexa, ask Goio what is a barraquito" or "Alexa, open Goio" to see what options are available, including Echo devices with displays.

What technologies are used?

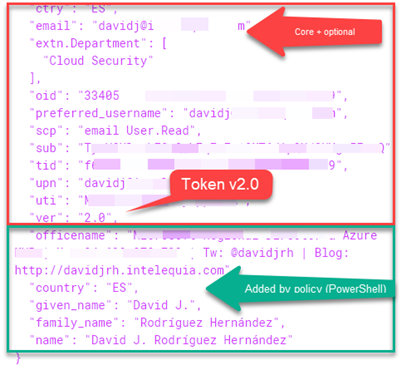
The virtual assistant is developed on the Microsoft Azure platform, through the integration of different available services. Some of these services are:

  • Azure Bot Service: for the management and integration of messaging channels such as Facebook, Telegram, Webchat or Alexa.
  • Cognitive Services: to guess the user's intention (LUIS); to store the knowledge database (QnA); or speech services for recognition or synthesis.
  • App Service: to host the virtual assistant, developed with Microsoft Bot Framework and .NET Core.
  • App Insights: to monitor conversations conducted with the virtual assistant as part of the ongoing training process

Stats

If we review the latest statistics, we have that in the last two years Goio has processed more than two million messages with nearly 300,000 user sessions, with an average of 2,250 messages per day, of which 20% of them have been COVID-related queries.

Also noteworthy is the great work done by the Infoten network to keep Goio's knowledge database up to date with relevant issues. This has led to a 60% satisfaction rate at launch in 2019 to currently reach 93%, which reflects the continuous monitoring and improvement in the assistant with the use of techniques such as Active Learning.

Don't go yet, there's more!

But that's not all. Creating artificial intelligence is an iterative process that consists of adding new skills by integrating cognitive services. In the next iterations that are already planned we have some interesting new features, such as finally having Goio through WhatsApp or in Google Assistant, as well as being able to respond in French and German.

So stay tuned for the next updates because Goio is already getting big.

More information:


miércoles, 12 de mayo de 2021

WORKAROUND: AD0001 Analyzer 'Microsoft.AspNetCore.Mvc.Analyzers.TopLevelParameterNameAnalyzer' threw an exception

Hello folks! This is just a quick blog post to show a workaround to https://github.com/dotnet/aspnetcore/issues/14723 (couldn't comment there because the msftbot locked the issue as resolved and limited the conversation to collaborators). I'm currently building a .NET 5 WebAPI project, that references Application Insights between other dependencies, causing that when building the project I'm getting a lot errors like the one below:

CSC : warning AD0001: Analyzer 'Microsoft.AspNetCore.Mvc.Analyzers.TopLevelParameterNameAnalyzer' threw an exception of type 'System.NullReferenceException' with message 'Object reference not set to an instance of an object.'.


As described in the GitHub thread, the cause is because we are mixing dependencies of 5.0 and 2.2 core versions.

The proposed workaround in the thread is to completely disable the Code Analysis, but I wanted to find a less dramatic approach.

Workaround

When checking the rules on the Microsoft.AspNetCore.Mvc.Analyzers, found just these 5 rules on the 2.2 assembly:

My approach was to just try disable these rules and allow all the others to run. But surprise, when testing disabling the rules, seems that the one causing the "TopLevelParameterNameAnalyzer" exception was the MVC1004.

Here is the quick workaround:

  1. Add a new item to the WebAPI project
  2. In the search box add "editorconfig" and then select the "editorconfig File (.NET)". Use the ".editorconfig" as name for the file
  3. Under the [*.{cs,vb}] section, add the rule "dotnet_diagnostic.MVC1004.severity = none" to disable this rule, and save the file

  4. Build the project and voilà, problem solved! I continue getting other code analysis warnings, but not this one.

Hope this helps!

miércoles, 21 de octubre de 2020

Storing Azure App Service secrets on Azure Key Vault

Today I'm going to show how to store Azure App Service configuration secrets on Azure Key Vault. In this example, I'm going to use a DNN Platform based website deployed on Azure App Service using a SQL Database, storing the SQL database connection string in Azure Key Vault. I won't change the application codebase to access the Azure Key Vault in any way. We Will take advantage of the App Service managed identity feature to automatically retrieve the Key Vault secrets.

Provision the Azure Key Vault

  1. Provision the Azure Key Vault


  2. For this demo, we will change the permissions model to the new Azure role-based access control (RBAC). It's currently in Preview.

  3. Depending on your deployment, change the Networking as desired. For this demo we will leave it as Public endpoint to match the App Service configuration

  4. Click on the Review + Create button to start the deployment
  5. Once created, add yourself to the role "Key Vault Administrator (Preview)" via the Access Control (IAM). Now you can start managing secrets.

Add the Connection String to the Key Vault secrets

  1. Add a new secret to the Key Vault

  2. Specify the secret of type "Manual", give it a name and set the value to the current SQL Database connection string stored in the Application web.config

  3. Click on Create. Once created, click on the secret to see the secret details, and then click again on the current version
  4. Next to the Secret Identifier, click on the copy to the clipboard button


Add the secret identifier reference to the Azure App Service Settings

  1. Open the App Service configuration settings, and add a new Connection String setting
  2. Type the name of the connection string ("SiteSqlServer" for DNN Platform) and set the value "@Microsoft.KeyVault(SecretUri=VALUE_FROM_CLIPBOARD)", where the VALUE_FROM_CLIPBOARD is the one from step 4 in previous section.
  3. Click on Save to save the app settings


Allow the App Service to access the Key Vault

  1. On the App Service again, click on Identity to enable the System Assigned identity.
  2. Click on save after turning "On" the status

  3. Click on the "Role Assignments" button and then click on the "Add role assigment (Preview)"

  4. In the role assignment, choose scope "Key Vault", subscription the subscription where you created the Key Vault on previous steps and the name of the Key Vault resource. For the role just select "Key Vault Secrets User (preview)"

  5. Finally go to the web.config file of your DNN Platform website and clear the connection string contents.

  6. Visit the website and check that loads successfully. Now the connection string is safely stored in the Azure Key Vault, and it's no longer stored on the file system.


Known issues

  1. ERROR: You get an error "Keyword not supported: '@microsoft.keyvault(secreturi'". I have experienced that the RBAC permissions can take a one or two minutes to be applied, so try after a few minutes. Also try restarting the application thought the App Service portal so nothing is cached.

  2. When checking the DNN log4net logs, you see lot of errors from a process trying to initialize a database connection with an invalid connection string during the DNN initialization process. This error is currently happening on versions 9.7.2 or earlier with a pending pull request to fix it https://github.com/dnnsoftware/Dnn.Platform/issues/4227
  3. IMPORTANT: If you plan to use the Azure App Service Backup feature, don't use this method to store SQL Database connection strings in Azure Key Vault, since the App Service backup feature doesn't support them https://stackoverflow.com/questions/56101504/backingup-azure-webapp-when-connection-string-is-injected-through-keyvault  

Hope this helps!


martes, 18 de agosto de 2020

Using custom claim mappings on DNN Azure AD module

With the arrival of the DNN Azure AD v4.0.x module, lot of new settings have been introduced to support scenarios that were already resolved with the twin module for Azure AD B2C. Things such as Role Sync, Profile sync (including the profile picture), JWT auth using Azure AD tokens on DNN WebAPI controllers, reusing the client-side token to call other services outside DNN and claim mapping are now supported.

Before continue reading, please note that Azure AD is supporting now 1.0 and 2.0 (preview) tokens, and there are some differences between them. I recommend to read "How to: Provide optional claims to your app" article

"While optional claims are supported in both v1.0 and v2.0 format tokens, as well as SAML tokens, they provide most of their value when moving from v1.0 to v2.0. One of the goals of the v2.0 Microsoft identity platform endpoint is smaller token sizes to ensure optimal performance by clients. As a result, several claims formerly included in the access and ID tokens are no longer present in v2.0 tokens and must be asked for specifically on a per-application basis."

I'm currently working on adapting the DNN Azure AD module v5.0 to fully supports the v2.0 Microsoft Identity Platform endpoint. The following instructions work for DNN Azure AD module v4.0.3 and later.

Configuring claim mappings

Let's start today with the new "User Mappings" tab.

The new mappings tab has three subareas:

  • User Mappings: area to specify how user mappings are done, by mapping user DNN user properties with claims available on the JWT issued token from Azure AD once signed in. These properties are fixed:
    • PortalId: (optional) Allows to specify a claim to map the user portal ID. Note that this must be implemented with an Azure AD User attribute through application extensions, see more on this later below;
    • Id: Allows to specify which claim will be used as User Id. By default, will be the "upn" (user principal name). You can potentially use "upn" or "unique_name" (this only only on v1.0 tokens), that looks like username@domainname (or username@tenant.onmicrosoft.com), the "oid" (object ID) claim that is the guid of the Azure AD user object, or any other claim uniquely that identifies the user, such as an Azure AD User attribute through application extensions with, for example, the EmployeeID as value.
    • FirstName: Allows to specify which claim will be used as first name. By default, the "given_name" claim
    • LastName: Allows to specify which claim will be used as last name. By default, the "family name" claim
    • DisplayName: Allows to specify which claim will be used as display name. By default, the "name" claim
    • Email: Allows to specify which claim will be used as e-mail. By default, the "upn" claim. The "email" claim can also be setup after adding it as optional claim to the token on the Azure portal, on the application token configuration section. This also requires to grant the "email" permission to the Azure AD application.
  • User Profile Mappings: area to specify mappings between user profile properties and token claims. Works in the same way than the user mappings, but you will be using mostly optional and custom claims setup on the Azure AD Application. See how to setup optional and custom claims below.
  • Role Mappings: this allows to map Azure AD roles with DNN roles. Has nothing to do with claims, and another article talking about role sync setup is coming.

The list of supported claims for an application can be obtained from:

  • v1.0 tokens: https://login.microsoftonline.com/{tenant}/.well-known/openid-configuration?appid={client-id}
  • v2.0 tokens: https://login.microsoftonline.com/{tenant}/v2.0/.well-known/openid-configuration?appid={client-id}

Plus, the "core claim set" present in every token regardless of the policy. These claims are also considered restricted and can't be modified. More info at https://docs.microsoft.com/en-us/azure/active-directory/develop/active-directory-claims-mapping

Also note that "upn", "given_name", "family_name" and "unique_name" claims are part of the "core claim set" when using v1.0 tokens, but are not included by default when using v2.0 tokens. "unique_name" is only available on v1.0 so the recommendation is to use "upn" instead that is available on both versions.

Token configuration on the Azure AD application

Once you have setup the application, by default you will be using the v1.0 endpoint so tokens will have the "core claim set" by default. A default issued v1.0 token will look like the one below:

The most interesting claims from the DNN point of view are:

  • "aud" (Audience): the audience of the token, normally the Application ID unless you change the audience setting on the JWT Auth settings on the module advanced settings
  • "exp" (Expires at): expiration datetime in "NumericDate" format
  • "amr" (Authentication Method References): indicating if the user used "pwd", "mfa", or other authentication methods
  • "appid": the application id setup on the DNN module settings
  • "family_name": the last name of the user as stored in Azure AD
  • "given_name": the first name of the user as stored in the Azure AD
  • "name": display name of the user as stored in the Azure AD
  • "ipaddr": client IP address from where the token was requested
  • "oid": object Id of the user as stored in the Azure AD
  • "scp": scopes allowed for the token (the module issues a token for all the scopes configured unless something else is setup in the API Resource settings on the module advanced settings).
  • "tid": Azure AD tenant id
  • "unique_name": (only on v1.0 tokens), the unique name of the user. When using external providers such as MSA, can be in the format "live#user@tenant". Recommended to use "upn"
  • "upn": the user principal name. Not available on v1.0 tokens and MSA (live.com, …) accounts.

So, by default, the default DNN Azure AD module configuration supports the default token settings to make the things easier to setup.

Setting up optional claims

With v1.0 tokens, you can specify two types of additional optional claims:

  • Built-in: you can specify optional built-in claims by selecting them through the token configuration application section or manually editing them directly through the manifest:

  • Extension attributes: you can create your own directory schema extensions for the application on the "Users" object and store your personal attributes directly on Azure AD. In order to do it, you need to modify the Azure AD schema first.
    • Open a new Azure Cloud Shell in the Azure portal (icon on the top right portal area) using a PowerShell console, and run the following commands
    • Login into Azure Active Directory

      > Connect-AzureAD


    • Set a variable with the application object Id. Note that this isn't the AppID, is the Application Object Id available on the application settings page on the Azure portal

      > $appObjectId = "xxxxxxx-xxxxx-xxxxx-xxxxx-xxxxxxxxxx"


    • Create the application extension property "Department"

      > New-AzureADApplicationExtensionProperty -ObjectId $appObjectId -Name "Department" -DataType "String" -TargetObjects "User"


    • Now set the setting of this user through the Graph API or just by executing the following PowerShell command, where $userObjId is the object Id of the user and <appId> is the App Id without dashes

      > Set-AzureADUserExtension -ObjectId $userObjectId -ExtensionName "extension_<appId>_Department" -ExtensionValue "Cloud Security"


      Once this is done, you can select the extension from the optional claims UI. The claim name will be "extn.<attributeName>" on the JWT token.


Now if you login again into the site, you will have the new claims as part of your token, and you can use them for mapping to user or profile properties.


Mapping non built-in Azure AD user object properties and more

All of what we have seen before has been done by using v1.0 tokens. What about adding non built-in properties, such as office location, phone number and so on? You can start using the new v2.0 tokens even while still using the 1.0 auth endpoint. How? I recommend first to take a look to the article "How to: Customize claims emitted in tokens for a specific app in a tenant (Preview)". Currently this way of customizing the claims is supported only by PowerShell, and when implemented, supersedes the claims customization offered through the portal today. Configurations made through the methods detailed in this section will not be reflected in the Azure portal (at the time of writing).

  • Edit the application manifest and set:

    "acceptMappedClaims": true,

    "accessTokenAcceptedVersion": 2


  • Open a PowerShell session in your desktop and install the AzureADPreview module (I tried to run this into the Azure Cloud Shell, and while I wasn't able to run the necessary commands):

    > Install-Module AzureADPreview


  • Login into Azure Active Directory

    > Connect-AzureAD


  • Obtain the service principal object

    > $appID = "xxxxxxxx-xxxx-xxxx-xxxx-xxxxxxxxxx" # The AppID of the application

    > $svcPrincipal = Get-AzureADServicePrincipal -Filter "servicePrincipalNames/any(n: n eq '$appID')"


  • Create a new Azure AD policy


    > $policy = New-AzureADPolicy -Definition @('{"ClaimsMappingPolicy":{"Version":1,"IncludeBasicClaimSet":"true", "ClaimsSchema": [{"Source":"user","ID":"physicalDeliveryOfficeName","JwtClaimType":"officename"},{"Source":"user","ID":"country","JwtClaimType":"country"},{"Source":"user","ID":"givenName","JwtClaimType":"given_name"},{"Source":"user","ID":"surname","JwtClaimType":"family_name"},{"Source":"user","ID":"displayName","JwtClaimType":"name"},{"Source":"user","ID":"userPrincipalName","JwtClaimType":"upn"}]}}') -DisplayName "IntelequiaWebMappings" -Type "ClaimsMappingPolicy"


  • Assign the new policy to the application

    > Add-AzureADServicePrincipalPolicy -Id $svcPrincipal.ObjectId -RefObjectId $policy.Id


  • Create an application signing key if not created before. This is necessary to use policy-based claims.

    > $appObjectId = "yyyyyyyy-yyyy-yyyy-yyyy-yyyyyyyyyy" # This is the object id of the application that can be found in the portal, not the application Id

    > New-AzureADApplicationKeyCredential -ObjectId $appObjectId -CustomKeyIdentifier "MySigningKey" -StartDate "11/7/2020" -Type "Symmetric" -Usage "Sign" -Value "P@assw0rd1!"


As result, we get a token like the one below. Note that the token includes the core claims set and the optional ones specified in the portal (because in the policy the "IncludeBasicClaimSet" was set to "true"), plus the claims added by setting the policy to the application.

References

martes, 10 de diciembre de 2019

Released DNN Azure AD B2C Provider v1.2

Hello folks. After building some sites with the new DNN Azure AD B2C provider, some new features have been being added over the last months, so is time to package them into a new release. I’m excited to announce the v1.2 release of the B2C provider, with solutions for some interesting scenarios. All the code is available at GitHub, and here is the link to the release notes:

Release notes

New features

  • Added support for multiple-portals scenario:
    • Added a new "Use Global Settings" setting to allow all portals on the same instance to share the configuration settings and use the same B2C tenant
    • Added a new "Redirect Uri" setting to allow customization of the redirection after a user login
    • Added a Redirection Controller to handle the user redirection on multi-portal auth scenario
    • Added support for the special user claim mapping "portalId", to use it as a filter per portal.
  • Added new support for custom claim mappings: user mappings, user profile mappings and role mappings. All the mappings are stored on the database and can be customized per portal.
  • New user management module allows to manage Azure AD B2C users directly from the DNN interface, including the force password reset attribute (check "Samples/CustomPolicies/SignInWithForcePasswordReset").
  • Now the user and role prefix can be disabled, so user and role names are more friendly (works really well when using "emails" claim as "Id" on the User mappings).
  • When using JWT auth, now the user is synced in the same way than when using the web UI, even if the user doesn't exist (the user is then created and synced).
  • Added Spanish (human) and German (auto) localizations.

Fixes

  • Cache is now correctly cleared out after a configuration change
  • User cache is correctly cleared out after a login, so the sync is done correctly
  • Other bug fixes

List of contributors

AzureAdB2C_03

Noteworthy Changes in v1.2

Claim and role mappings by portal

This is one of the biggest changes on this version, allowing to map not only the user profile attributes, but also the user properties (username, Firstname, Lastname, email and portalId) as well as mapping the role synchronization (map a B2C role with an existing DNN role). Note that when using claim mappings, you can use custom attributes by adding the “extension_” prefix to the claim value (i.e. “extension_LoyaltyNumber”).

In this version, all the mappings are now stored on the DNN database and can be setup per portal.

SetupMappings_1

Multi-portal support

The provider now supports working with multiple portals and sharing the same Azure AD B2C scenario with the introduction of some new settings to simplify the maintenance and make it possible. The first important setting is the “Use Global Settings”, so when this setting is set, all the provider settings are stored at host level instead of per portal (even the claim mappings).

A special mention to the “Redirection Controller” with the endpoint https://mysite.com/api/DotNetNuke.Authentication.Azure.B2C.Services/Authorization/RedirectToPortal built for this scenario, and successfully redirecting the user to the right portal when the B2C tenant is being shared across the DNN instance.

To take advantage of the new multi-portal support, you just need to setup two things:

  • Create a custom attribute called “portalId” of type “Integer” on the B2C tenant
  • Setup the “portalId” user mapping

Then you optionally can use the two new settings mentioned on the previous paragraphs to make the whole configuration easier.

SetupPortalId_1

SetupPortalId_2

New User Management Module

There is a new user management module that allows to manage the B2C users directly from the DNN user interface. The module uses the MS Graph API under the hoods, so the advanced settings must be setup before using the module. Operations allowed on this version are: CRUD user operations (including specifying auto-generated or manually entered passwords), sending a welcome e-mail, modifying the role membership and force the password on the next logon.

AzureAdB2C_07

To allow the “Force password reset” command to work, a B2C custom policy must be setup. The steps would be:

Give it a try and if you found any issue, please fill an issue on GitHub! Pull requests are welcomed!

Related Posts Plugin for WordPress, Blogger...